SUMMARY
This article pertains to Web1040 Pro Search Tools
_______________________________________________________________________________________________________________________________________________________________
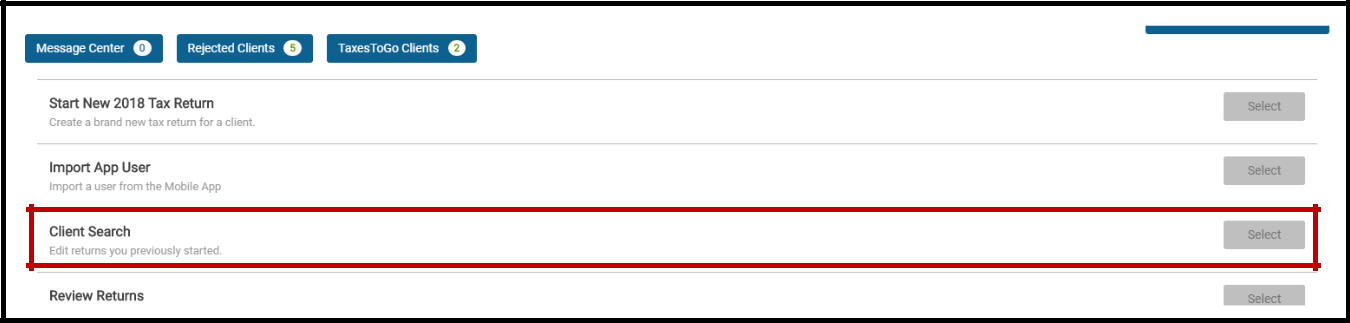
Client Search
To get to the Client Search in Web1040 Pro, from the Welcome Page select:
Filtering Clients
From the Client List, you can filter the list by Return Status, Return Tag, Date, or Name. As you modify the filters the changes will show real time in the Client List.

Once IRS Acknowledgements come in, they will reflect accurately in the Client List under the Status category. Each of the categories shown can be sorted by ascending or descending order. To open a return from the list just choose Select next to the return.
From this page you can also add Notes and Tags to a return, as well as Print the return using your Custom Print Sets.

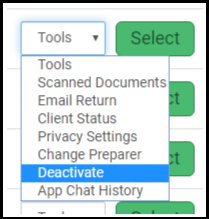
Tools Drop-down
The Tools drop-down in the Client List allows you to quickly access the return’s Scanned Documents, Client Status, Email the return, and even change the preparer.

Scanned Documents
Scanned documents are stored temporarily for review purposes only. They are not a permanent storage solution. They will only remain in the program while that year is supported. Make sure you keep your local copies of documents for long term storage or save them as a PDF document within the computer. To scan documents, click on Upload Documents, Drop files to upload or click and choose the PDF document to open.
Email Return
This sends an encrypted PDF of the taxpayer’s tax return, which is password protected, to the taxpayer. In the Message Body, it explains that the attached tax information requires the password created by the preparer to open the PDF. Once you click on Email Return, the program will automatically generate and attach the PDF to the email. The taxpayer’s email address is manually entered in Send To, and the preparer’s email information will be prepopulated based on the email address entered in Configuration. Click on Send Email to send the return.
Client Status
To view the status of a client’s return, select Client Status from the Tools drop-down box in the Client Search Menu.
As the office receives acknowledgements from the IRS, the state(s), and the bank product provider, client status will be updated automatically with the latest information regarding the status of the client’s return. From the Client Status screen, the preparer will be able to determine the following:
- Type of electronic return sent (Electronic mailed, Direct Deposit, Bank Product)
- Transmission date(s) and time(s)
- Preparation fees, electronic filing fees, total fees
- Accepted or rejected status for the federal and state return
- The reject code(s) and details of reject code(s)
- Expected refund or amount due
- If an extension was filed for this client
- Client Return History – Action, Log Time & Date, Preparer Name, ERO, SSN, States on Return, Return Information, Return Fees
When returns are Rejected by the IRS, you will see the reject code and the transmission details listed in Client Status.

Client Status also has the Return Audit History. This will allow you to see when changes happened in the return, including when the return was created and when it was printed.

Federal Reject Codes
The IRS Acknowledgements heading shows the reason the return was rejected. The explanation of the reject is found under Additional Information. Client Status will display SSN associated with the rejection. This will allow the preparer to make the appropriate corrections for the individual.
State Reject Codes
Most states maintain their own database of state rejection codes. After the IRS and/or State corrections are made, the return can be re-transmitted. In the event the rejection was made for the state, the preparer should send the corrected version as a State Only return. To make this election, click on the Send State Only box located on the E-File page’s Return Type section.
NOTE: If the Federal Return is rejected by the IRS, the Sate Return will not be sent. The State Return cannot be sent in until the Federal Return has been accepted unless it is being sent as a state-only return.
Privacy Settings
To mark the selected return as a “private return”, select this option from the drop-down menu. Select Yes from the drop-down box next to the question – “Would you like to make this return private?” Then, enter a password for this return. To ensure accuracy, the preparer will enter the password twice. After the return has been password protected, the password must be entered each time a preparer attempts to open the return.

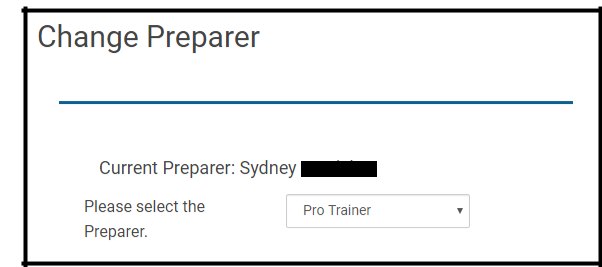
Change Preparer
To change the preparer assigned to a return, select this option from the drop-down menu in the Select Option box. When this option is selected, a box displaying the current preparer and an option to select a different preparer will be displayed on the screen. Select the new preparer from the drop-down list of preparers that have been added in the configuration menu. Select the Continue button to save changes.
Deactivating/Deleting Returns
In rare events, a preparer may need to deactivate a return. This is done in the Office Client List. When a return is deactivated, Web1040 Pro makes it unavailable for edits. These returns will remain in your Client List, but with the status Deactivated. They will not be removed or deleted from your program. Deactivated returns can be reactivated by re-entering the Social Security Number as if starting a new return and selecting to reactivate the existing return.
NOTE: If you are a Pay-Per-Return user, each deactivated return will still count towards your total number of returns used.
To deactivate a return, use the following steps from the Welcome page:
Click Select on the Client Search line to get to the Client List:

Next, select the Tools drop-down to show the Deactivate option:
NOTE: Returns can only be deactivated if they are In Progress or Failed Review. If the return has already been marked Complete, you will need to move it back to In Progress to deactivate. Transmitted returns cannot be deactivated.
After clicking Deactivate from the Tools drop-down, you will see the following question:

You will then see the status show Deactivated in the Client List:

Review Returns
This utility allows the tax preparer to mark the return for further review. The reviewing tax preparer will click on the return(s) for review. Once the return has been reviewed, the preparer can continue with the E-File Process.
When returns have been marked for review, they will populate in the Review Returns queue and you will see a green asterisk next to the title.

Once you get to the end of a return that has been marked for review you will have the option to either Approve or Fail the return. Since the return has been marked for review, you cannot E-File the return until it has been Approved.
If you Fail the Return Review, you will need to specify why:
